Упътване за употреба IN 7565 бягаща пътека insportline Mendoz (QST8438) 1
|
|
|
- Милена Портной
- преди 5 години
- Прегледи:
Препис


1 Упътване за употреба IN 7565 бягаща пътека insportline Mendoz (QST8438) 1
2 Препоръка: Преди първото използване и преди монтаж, моля прочетете внимателно това ръководство и го запазете. Гаранционни условия: 1. Гаранцията се отнася за дефекти, възникнали в процеса на нормална експлоатация по време на гаранционния период. 2. Ремонт на повреден уред се извършва във фирмен сервиз или друг оторизиран такъв, като клиентът доставя уреда до сервиза. Той може да поиска да се изпрати техник до дома му, което се заплаща допълнително по ценоразпис на продавача. 3. Гаранционното обслужване се извършва само, когато изделията са в оригинална опаковка и пълна окомплектовка в сервизните бази на фирмата. При гаранционни изисквания от страна на купувача сервизът е длъжен да отремонтира стоката в рамките на 25 р. дни. Ако това е невъзможно уредът се заменя с нов от същия модел или с друг подобен модел. Ако и това е невъзможно се възстановява платената сума от клиента. 4. Рекламация за липсващи компоненти се признава само по време на монтажа от техник на фирмата или при покупката. 5. Продавачът носи отговорност за липсата на съответствие на стоката с датата за продажба съгласно ЗЗП независимо от гаранцията. Гаранцията не се признава в следните случаи: Неспазване на указанията за експлоaтация и съхранение посочени в съпровождащата документация; Повреди, настъпили при транспортиране, при механични увреждания на корпуса или дисплея; Опит за отстраняване на дефекта от неупълномощени от фирмата лица; Опит за подправяне на гаранционната карта, фабричния номер или представяне на непопълнана гаранционна карта; Повреди, настъпили вследствие на природни бедствия (гръмотевици, наводнения, земетресения, пожари и др.), от токови удари,от попадането на течности и инсекти в изделието, влажна среда и др. Използване на устройствата съвместно с други неизправни или несъвместими модули и устройства. Препоръчваме първоначалният монтаж да бъде направен от представител на фирмата /таксува се по ценоразпис на продавача/. При неправилен монтаж извършен от купувача в несъответствие с приложените схеми гаранцията отпада. Ако не е направена ежегодна техническа профилактика на уреда. Тази услуга се заплаща от купувача Уредите са предназначени само за домашна употреба, забранява се използването им за професионална употреба. Неподлежащи на безплатно гаранционно обслужване са: скърцане, разхлабени връзки вследствие на експлоатацията, козметични части и части отделящи се от основното тяло на уреда, пластмасови декорации, гумени уплътнения, ремъци, лагери и втулки с ограничен сервизен живот. Батерии, консумативи и външни захранвания. За правилното функциониране на уредите, спазвайте редовно указанията за експлоaтация. 2
3 Инструкции за безопасност Обърнете внимание на следните инструкции. Съобразете натоварването със вашето физическо състояние и не се претоварвайте. Изберете подходящо спортно облекло. Неуместно е да се носят широки дрехи, които могат да се захванат от машината. Носете подходящи спортни обувки. Не оставяйте деца и животни сами в помещението с бягащата пътека. Бягащата пътека не е подходяща за деца! Не използвайте пътеката при висока влажност на въздоха и я пазете от пряка слънчева светлина. Ако няма да използвате устройството за дълъг период от време, изключете го от контакта и извадете ключа за безопасност. Стойността на пулса е ориентировъчна и не бива да се прави оценка на здравословното състояние от нея. Преди да започнете тренировка се уверете, че всички болтове и гайки са добре затегнати. Поставете пътеката върху гладка и чиста повърхност. Не я поставяйте в близост до остри ръбове, източници на вода или топлина. Ако започнете да се чувствате замаяни, да ви се вие свят или получите болки в гърдите, спрете тренировката и се консултирайте с лекар. Повече от един човек не бива да се качва върху пътеката. Използваните резервни части трябва да са само на InSportline. Теглото на потребителя не бива да надвишава 120 кг. Ако имате някакво заболяване или сте над 35 години първо се консултирайте с лекар. Ако е нужно обсъдете тренировъчата си програма с него. Бременни жени не трябва да използват уреда, освен ако не са се консултирали с лекаря си. Специални мерки за безопасност Поставете бягащата пътека близо до източника на захранване. Контакта трябва да е заземен. Не препоръчваме използването на разклонител. Ако контакта не е правилно заземен съществува риск от токов удар. Ако не сте сигурни дали контакта е заземен, моля консултирайте се с електротехник. 3

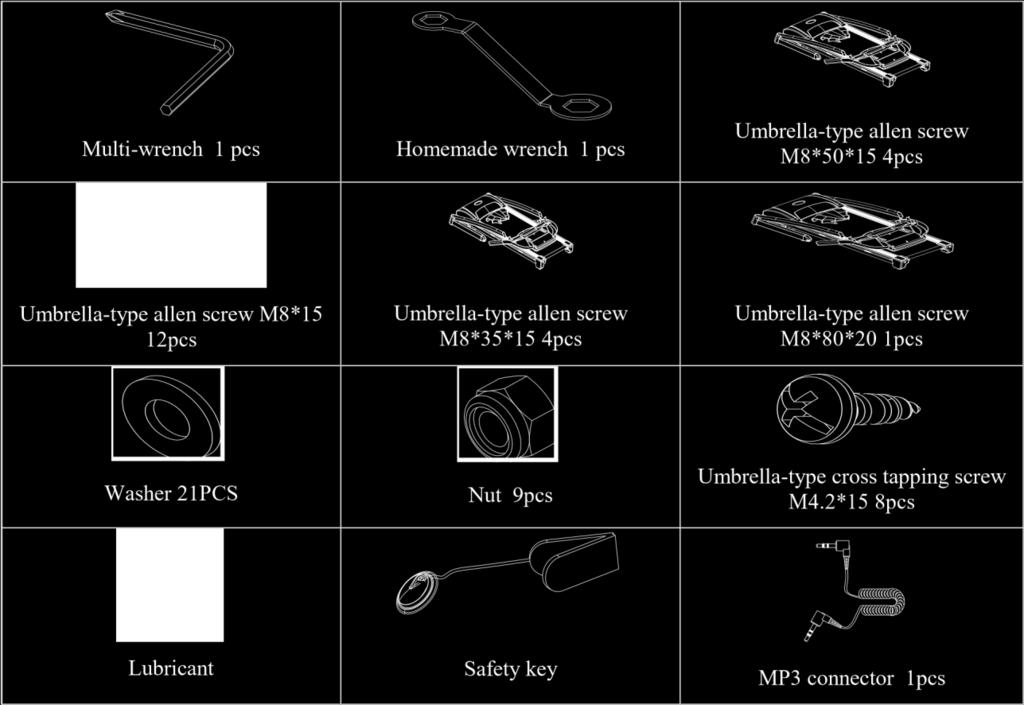
4 Колебания в напрежението могат да повредят устройството. Включване на други устройства към контакта могат да предизвикат колебания в напрежението. Уреда е предназначен за напрежение в диапазона V. Уверете се че захранващия кабел не е в близост до транспортните колела. Внимавайте кабела да не попадне под устройството. Не използвайте увреден захранващ кабел. При почистване на пътеката я изключете от електрическата мрежа. Не използвайте уреда на открито, в гараж или под навес. Не излагайте на влага или директна слънчева светлина. Ако захранващия кабел е повреден, той трябва да бъде подменен оот квалифицирано лице. Не ремонтирайте уреда сам, има риск от токов удар. Уверете се, че бягащата лента е опъната преди да започнете да тренирате. Разопаковайте всички части Следвайте инструкциите от това ръководство. Проверете дали всички части са доставени. 1. Разопаковайте бягащата пътека. 2. Ако някой от елементите липсва, моля обърнете се към вашия дилър. 4

5 5

6 СХЕМА НА СЪСТАВНИ ЧАСТИ Всички съставни части нужни за монтажа са показани на фигурата. СПИСЪК НА ЧАСТИТЕ No. Component Quantity 1 Base frame 1 2 Frame 1 3 Left pillar accessory 1 4 Right pillar accessory 1 5 Dashboard frame 1 6 Incline frame 1 6
7 7 Pressure stick 1 8 Motor stator 1 9 Front roller 1 10 Back roller 1 11 Motor 1 12 PCB 1 13 Incline motor 1 14 Running belt 1 15 Running board 1 16 Multislot belt 1 17 Motor cover 1 18 Side rail 2 19 Left back cover 1 20 Right back cover 1 21 Connector part for base frame 1 22 Adjusting foot pad 5 23 Left decorating cover at base 1 24 Right decorating cover at base 1 25 Base handling wheel set 2 26 Lower cover of motor 1 27 Shock absorption 6 28 Long shock absorption 4 29 Locating pad for side rail 8 30 Rubber transporting wheel 2 31 Transporting wheel at base 2 32 Upper cover of meter 1 33 Lower cover of meter 1 34 Power switch 1 35 Overload protector 1 36 Reed pipe for safety key 1 37 Safety key 1 38 Sponge sheath 2 39 Heart rate and speed +- key 1 40 Heart rate and incline +- key 1 41 PCB for console 1 42 Push-key board 3 43 Sensor wire 1 7
8 44 Upper communication line 1 45 Lower communication line 1 46 Red connecting line 1 47 Red connecting line 1 48 Green connecting line 1 49 Power wire 1 50 Speaker 2 51 MP3 module 1 52 Solid tube for multifunction frame 1 53 Multifuntion frame 1 54 Sponge protecting bush 4 55 Tube plug 4 56 Massage head 1 57 Fan 1 58 Solid tube for twister 1 59 Push-up handlebar 2 60 Push-up handlebar sponge 2 61 Twister 1 62 Tube plug washer 4 63 Dumbbell set 2 64 Dumbbell shelf 6 8
9 TREADMILL STRUCTURE 9
10 Сглобяване Стъпка 1: Поставете опорните тръби върху основата a) Свържете комуникационния кабел в дясната тръба. b) Поставете опорните тръби в горната част на основата, на показаното място. Използвайте 2 бр от винт M8*15 с 2 бр от шайбите и 4бр болта M8*50 с 4 бр шайби, 4 бр от гайки за да закребите тръбите. (Не затягайте силно първоначално) STEP 2: Поставете компютъра върху трабите a) Моля, уверете се, че сте свързали правилно комуникационния кабел. b) Поставете компютъра върху трабите. Използвайте 6 бр от болта M8*15 със 6 бр гайки за да прикрепите. (Не затягайте силно първоначално) c) След като включите уреда в захранването, натиснете бутона Start, ако не ви покаже грешка и уреда стартира правилно, затеглете болтовете от предишните стъпки. 10
11 STEP 3: Поставете фиксиращата тръба върху опорните тръби Използвайте 4 бр болта M8*15 с 4 бр гайки за да фиксирате. (Не затягайте силно). STEP 4: Поставете мултифункционална рамка на фиксираща тръба a) Използвайте 2 бр болта M8*35 с 2 бр шайби, 2 бр гайки за да фиксирате. (Не затягайте силно) b) Използвайте болтове M8*80 с шайби и гайки за да фиксирате мултифункционалната рамка и след това затегнете всички болтове. c) Поставете 4 бр меки предпазители. STEP 5: Поставете масажиращия уред върху мултифункционалната рамка. 11
12 Използвайте 3 бр болтове M8*15 с 3 бр гайки за да фиксирате. STEP 6: Поставете декоративни елементи. STEP 7: Премахнете предпазната скоба от основата. STEP 8: Поставете ротиращия диск. 12
13 Използвайте 2 бр от M8*35 болта, 2 бр гайки и 2 бр болта за да фиксирате. STEP 9: Поставете поставките за дъмбели. a) Използвайте 4 бр болта ST4.2*15 за да закрепите поставките. b) Поставете дъмбелите на поставките и селд това поставете поставките за лицеви опори (както е показано). Използване Поставете захранващия кабел и включете бутона за захранването. Бутона трябва да свети ако е включено захранването. 13

14 Предпазен ключ Уреда може да работи, само когато е поставен правилно предпазния ключ на неговото място. Преди да започнете да тренирате, свържете другия край на предпазния ключ към вашта дреха. Предпазния ключ служи, ако възникне падане или друг вид нужда от внезапно спиране, да спре уреда мигновенно. Прибиране / Разгъване Прибиране: Вдигнете основата за да спестите място. Преди да вдигнете основата, изключете уреда от захранването. Вдигнете основата до като подпората се заключи. Разгъване: Стъпете на предпазителя на упората и след това свалете основата. 14

15 Инструкции за работа с компютъра Tech info: Време Скорост 00:00-99:59 Min km/h Наклон 0-15% Разстояние Калории Пулс km KCAL / Min Програми Готови програми P1-P99 Потребителски програми Телесна маса U1-U2 FAT 15


16 Пол 01/02 (men/women) PANEL KEYS AND FUNCTIONS Вентилатор Използвайте за да включите/изключите вентилатора. START/STOP бутон: Натиснете start / stop бутон за да стартирате/ спрете уреда. Reset: Натиснете "Stop" бутон двапъти продължително, уреда ще занули всички стойности след натискане на "Start ". PROG. Бутон След като сте включили уреда, натиснете "PROG.", ще може да изберете от готовите програми P1-P99 и FAT (телесни мазнини). P1-P99 са вградени програми, FAT е програма за измерване на телесните мазнини. След като изберете програма, натиснете start за да стартирате програмата! MODE Бутон След като сте включили уреда, натиснете "MODE.", ще може да изберете между 30:00, 1.0 or :00 е обратно броене на време, 1.е обратно броене на дистанция, 50 е обратно броене на калории. След като изберете програма, натиснете start за да стартирате програмата! 16


17 SPEED Бутон Когато е включен уреда, тези бутони се използват за настройване на някой стойности. Когато лентата се движи, тези бутони се използват за промяна на скоростта с 0.1 km/. INCLINE Бутон Когато е включен уреда, тези бутони се използват за настройване на някой стойности. Когато лентата се движи, тези бутони се използват за промяна на наклона с 1%. SPEED direct Бутон Бутони с готови настройки на скорост 4 km/h, 8km/h, 12km/h. INCLINE direct key Бутони с готови настройки на наклон 3%,9%,15%. 17
18 Екран A TIME: Показва време или пулс HIGHT: Показва височина B CALORIES: Показва калории WIGHT: Показва тегло C INCLINE: Показва наклон PULSE: Показва пулс D DISTANCE: Показва разстояние FAT: Показва телесни мазнини E SPEED: Показва скорост SEX: Показва пол Програми QUICK START (за потребителски настройки) Включете уреда и поставете правилно предпазния ключ. Натиснете START бутон, след това ще се появи 3 секундно отброяване! След приключване на отброяване, уреда ще стартира със скорост 1.0km/h. Може да използвате SPEED+, SPEED- за скорост, или INCLINE, INCLINE за да смените наклона. Ако поставите ръцете си на ръкохватките със сензора за пулс за около 5-8 секунди, на екрана ще се появи вашият пулс. MANUAL MODE Включете уреда и натиснете "Start", Уреда ще стартира със скорост 1.0km/h и наклон 0%.На екрана ще започне отброяване от 0. Натиснете INCLINE, INCLINE, SPEED+, SPEED-, за да промените настройките. 18
19 След като включите уреда, натиснете MODE за да влезете в режим на отброяване на време. На екрана Time показва 30:00 и мига, за да настроите времето натиснете SPEED+, SPEED- за да промените продължителността в интервала 5:00 99:00. Отброяване на дистанция натиснете MODE. Покава се на екрана DIST показва 1.0 и мига INCLINE, INCLINE, SPEED+, SPEED- за настройване на дистанция Калории, натиснете MODE. Показва се CAL и мига 50 INCLINE, INCLINE, SPEED+, SPEED След приключване на настройките, натиснете start за да стартирате. На екрана ще стартира 3 секундно отброяване! След като приключи отброяване, уреда ще стартира със скорост 1.0km/h. Натиснете INCLINE, INCLINE, SPEED+, SPEED- за да настроите уреда. Натиснете stop, уреда ще започне да спира плавно. PRESET PROGRAM (Готови програми) There are 99 built-in programs P1-P99,Under ready condition, press PROG. Key continuously, Window PROGRAM will display P1-P99, FAT in turn. P1-P99 are built-in programs. After selecting specific program, press MODE, Window Time displays 30:00 and shining, you could press INCLINE. INCLINE, SPEED+, SPEED- to set exercise time from 5:00 99:00. After setting, press START to start the machine. Built-in programs have 10 parts, the time for each part=setting time / 18. When machines come into next part, there will be a voice Bi-Bi- Bi for 3 times to remind you, and speed and incline will be changed according to the built-in programs. No matter whether you have pressed INCLINE, INCLINE, SPEED+, SPEED- to change speed and incline in front parts. After finishing one program, there will be voice Bi- Bi-Bi for 3 times, the machine stop slowly and End will be displayed on the window. 5 seconds later, the machine will come into ready condition. USER-DEFINED PROGRAM Setting for user-defined program: Under ready condition, press PROG. Key continuously, Window PROGRAM will display P1-P99, U1U2, FAT in turn. U1-U2 are user-defined program. After selecting U1 or U2, press MODE to set, SPEED+, SPEED- to set speed, INCLINE, INCLINE to set incline. After setting, press MODE key to finish one part and come into next part. After finishing setting for 10 parts, press start to start the machine. Userdefined program will be kept in the machine forever unless you reset them. These data can t be lost even outage. Special explain: Every mode has 10 parts. You can only press START key to start the machine after finishing all parts setting and total exercise time setting. Data range: Parameter Setting range Displayed range Time (minute:second) 5:00-99:00 0:00-99:59 Incline (%) Speed (KM/H) Distance (KM) Heart rate (time/minute) N/A Calorie (cal) BODY FAT TEST Under ready condition, press PROG. Key continuously to come into FAT. Press MODE key, you could find HEIGHT, WEIGHT, AGE, SEX, FAT displayed on the window. Press INCLINE, INCLINE 19
20 SPEED+, SPEED- to set. After setting, press MODE to come into FAT. At this time, put your hand on the heart pulse for 5-8 seconds, there will be body fat date displayed on the window. You could find whether your weight and height matches. (This data only for reference, can t be used for medical data) F-1 SEX MAN WOMAN F-2 AGE F-3 HEIGHT F-4 WEIGHT P BODYFAT 19 Underweight BODYFAT =( ) Normal weight BODYFAT =( ) Overweight BODYFAT 30 Obesity POWER SAVE MODE Our machine has power save function. When you turn on power switch for 10 minutes and don t press any key, the machine will come into power save mode and there is no light on the screen. You could press any key into ready condition. MAINTENANCE Identification ways for the degree of tightness of running belt and poly V-belt: When the running belt skips, please follow the steps as follows to make sure which belt needs to be adjusted, running belt or poly V-belt. a) Unplug all power supply, screw and remove the Base cover. b) Turn the speed to be around 3km/h, step on the running belt by pressure and try your best to make the running belt stop. If running belt stops, together with the front roll, but the motor still runs, under this condition, it means the poly V-belt needs to be adjusted. c) Turn the speed to be around 3km/h, step on the running belt by pressure and try your best to make the running belt stop. If running belt stops, but front roll still runs, under this condition, it means the running belt needs to be adjusted. The adjustment steps for poly V-belt: a) Unplug all power supply and take off the base cover. b) Loosen the four screws for the motor, adjust the V-belt tension bolts in clockwise direction, and then tighten back the four screws for the motor. Adjustment running belt: a) Turn the speed to be 6km/h. for running b) Turn the both tension screws located at the end of the treadmill on the right and left sides, half a turn clockwise using the Allen key. (Diagram1 and Diagram 2) c) After adjustment, running belt still slips; please repeat the steps as above. 20
 Place the treadmill on a horizontal floor, turn the speed to be 6 km/h for running.")
 c) If the running belt is deflected to the left, adjust the bolt on the left by turning it for half a turn clockwise, then adjust the bolt on the right by turning it half a turn")
21 Tighten the running belt (Diagram 1) Loosen the running belt (Diagram 2) The adjustment steps for running belt deflection: The running belt will be deflected more or less under using. Then it needs to be adjusted. The steps are as follows: a) Place the treadmill on a horizontal floor, turn the speed to be 6 km/h for running. b) If the running belt is deflected to the right, adjust the bolt on the right by turning it for half a turn clockwise, then adjust the bolt on the left by turning it half an anti-clockwise.(see Diagram 3) c) If the running belt is deflected to the left, adjust the bolt on the left by turning it for half a turn clockwise, then adjust the bolt on the right by turning it half a turn anti-clockwise.(see Diagram 4) d) After the adjustment, the running belt still keeps deflecting, please repeat the steps above. The adjustment for right deflection (Diagram 3) The adjustment for left deflection (Diagram 4) Running board lubrication- Silicone oil has been provided (White Bottle) The treadmill is brand-new and has been pre-factory lubricated. Lubrication is not necessary directly after purchase. Lubrication needs constant maintenance termly after purchase. The friction between the running board and running belt has a great effect on the treadmills life. So please lubricate your machine termly (every one month). The steps are as follows: Step 1. Please unplug power supply for the treadmill and loosen the belt (Belt tension screw located at the end of the treadmill). Step 2. After loosening the screw, lift up the running belt and clean in-between the running board. Squeeze the small white bottle of SILICONE oil which was supplied with your purchase and wipe it evenly across the board. Step 3. After lubricating the board, screw the belt tension back to its correct tension. Tighten evenly on both sides. When it is almost tensioned, run the treadmill at 1km without any load. Adjust both tension screws to make the belt in the centre of the back roller. Run the treadmill at 5km for 3mins. Step 4. Stop the treadmill and start to walk on it at 5km/h. Lastly fine tension both screws until it s running smoothly with your weight on. CLEANING a) Please power off and pull the plug out before cleaning. 21
22 b) Wipe out the dust stuck on the surface and running board frequently. c) Please clean the surface of frame and running belt with a soft cloth dipped with suds, don t use things like eradicator and naphtha.(after cleaning, please dry it for use) d) Please take the protecting cover off every two month, use vacuum dust-collector to suck the dust remaining inside of the protecting cover.(the dust will make the components of circuitry board short circuit ) CAUTIONS, DEPOSITING Cautions Please make sure that the plug has been pulled out before cleaning or maintenance. Depositing The treadmill should be deposited indoor in case of being damp. Water can t be spattered and nothing can be laid and inserted on the treadmill. Please keep the air a little humid in winter. And please void the big static electricity, it may disturb the operation of meters or even damage them. GUIDES FOR MALFUNCTION Analyzing and eliminating malfunction Item. Malfunction Reasons Solution 1 Treadmill can t be started The safe key isn t in the right position Put the safe key in the right position The electrical switch is placed to 0 Turn the electrical switch to 1 2 Meter can t display The meter and upper communication line are not connected well The upper communication is broken Disassembly meter and check the upper communication line, make sure that meter and communication line are connected well. Replace it! 3 Heart rate can t be displayed The pole of heart rate sensor is not wet enough Disturbed by electromagnetism Wet the pole with water or liquor for hard contact lenses Stay away from electromagnetism 4 Incline doesn t work The motor wire is not well connected Open the motor cover and reconnect it 5 Running belt runs faster or slower than what has been displayed Unadjusted 6 Running belt slips Running belt is not tight enough Readjust it Please read Maintenance: The adjustment steps for poly V-belt / Adjustment running belt 7 Running belt is deflected 8 Displayed E0 on the screen The running belt is unadjusted. No safety key signal Please read Maintenance: The adjustment steps for running belt deflection If safety key on machine, then check the connecting part and make sure safety key are connected well. Otherwise, replace it! 22
23 9 Displayed E01 on the screen 10 Displayed E02 on the screen 11 Displayed E03 on the screen 12 Displayed E04 on the screen 13 Displayed E05 on the screen 14 Displayed E06 on the screen 15 Displayed E08 on the screen 16 Displayed E09 on the screen 17 Displayed E10 on the screen 18 Displayed E12 on the screen No sensor signal The trouble of PCB Big fluctuated speed The PCB and meter cannot communicate with each other over current protection The problem of motor Overload protector Overhot protector Overvoltage protector incline alarm Check sensor wire, whether it is been connected well or whether it is broken. IGBT-CE open circuit, replace PCB. If this problem happened when speed is bigger than 8km/h, then the reason is overload and running belt is broken or lack of oil. If the motor has been used for a long time, then replace the motor. Otherwise, replace the PCB. Check the lower communication line, make sure that PCB and lower communication line are connected well, Check the upper communication line, make sure that meter and upper communication line are connected well. Check whether it is overloading Check the motor are connected well, otherwise, replace motor and PCB in turn to check them. If it is not overload, then add oil for running board, change the running belt or running board, change the PCB in turn to check! Stop the machine and make it to be cold. If it happens when in normal temperature, then replace PCB. Check the voltage, whether it is normal! Check the VR wire, AC wire, connecting wire of incline motor, incline motor and PCB, whether they are connected well or broken. After checking, restart the PCB. If you still can t solve the problems after taking the solutions above, we hope that you can contact our dealer or company as soon as possible. TERMS AND CONDITIONS OF WARRANTY, WARRANTY CLAIMS General Conditions of Warranty and Definition of Terms All Warranty Conditions stated hereunder determine Warranty Coverage and Warranty Claim Procedure. Conditions of Warranty and Warranty Claims are governed by Act No. 40/1964 Coll. Civil Code, Act No. 513/1991 Coll., Commercial Code, and Act No. 634/1992 Coll., Consumer Protection Act, as amended, also in cases that are not specified by these Warranty rules. The seller is SEVEN SPORT s.r.o. with its registered office in Borivojova Street 35/878, Prague 13000, Company Registration Number: , registered in the Trade Register at Regional Court in Prague, Section C, Insert No According to valid legal regulations it depends whether the Buyer is the End Customer or not. 23
24 The Buyer who is the End Costumer or simply the End Costumer is the legal entity that does not conclude and execute the Contract in order to run or promote his own trade or business activities. The Buyer who is not the End Customer is a Businessman that buys Goods or uses services for the purpose of using the Goods or services for his own business activities. The Buyer conforms to the General Purchase Agreement and business conditions to the extent specified in the Commercial Code. These Conditions of Warranty and Warranty Claims are an integral part of every Purchase Agreement made between the Seller and the Buyer. All Warranty Conditions are valid and binding, unless otherwise specified in the Purchase Agreement, in the Amendment to this Contract or in another written agreement. Warranty Conditions Warranty Period The Seller provides the Buyer a 24 months Warranty for Goods Quality, unless otherwise specified in the Certificate of Warranty, Invoice, Bill of Delivery or other documents related to the Goods. The legal warranty period provided to the Consumer is not affected. By the Warranty for Goods Quality, the Seller guarantees that the delivered Goods shall be, for a certain period of time, suitable for regular or contracted use, and that the Goods shall maintain its regular or contracted features. The Warranty does not cover defects resulting from: User s fault, i.e. product damage caused by unqualified repair work, improper assembly, insufficient insertion of seat post into frame, insufficient tightening of pedals and cranks Improper maintenance Mechanical damages Regular use (e.g. wearing out of rubber and plastic parts, joints etc.) Unavoidable event, natural disaster Adjustments made by unqualified person Improper maintenance, improper placement, damages caused by low or high temperature, water, inappropriate pressure, shocks, intentional changes in design or construction etc. Warranty Claim Procedure The Buyer is obliged to check the Goods delivered by the Seller immediately after taking the responsibility for the Goods and its damages, i.e. immediately after its delivery. The Buyer must check the Goods so that he discovers all the defects that can be discovered by such check. When making a Warranty Claim the Buyer is obliged, on request of the Seller, to prove the purchase and validity of the claim by the Invoice or Bill of Delivery that includes the product s serial number, or eventually by the documents without the serial number. If the Buyer does not prove the validity of the Warranty Claim by these documents, the Seller has the right to reject the Warranty Claim. If the Buyer gives notice of a defect that is not covered by the Warranty (e.g. in the case that the Warranty Conditions were not fulfilled or in the case of reporting the defect by mistake etc.), the Seller is eligible to require a compensation for all the costs arising from the repair. The cost shall be calculated according to the valid price list of services and transport costs. If the Seller finds out (by testing) that the product is not damaged, the Warranty Claim is not accepted. The Seller reserves the right to claim a compensation for costs arising from the false Warranty Claim. In case the Buyer makes a claim about the Goods that is legally covered by the Warranty provided by the Seller, the Seller shall fix the reported defects by means of repair or by the exchange of the damaged part or product for a new one. Based on the agreement of the Buyer, the Seller has the right to exchange the defected Goods for a fully compatible Goods of the same or better technical characteristics. The Seller is entitled to choose the form of the Warranty Claim Procedures described in this paragraph. The Seller shall settle the Warranty Claim within 30 days after the delivery of the defective Goods, unless a longer period has been agreed upon. The day when the repaired or exchanged Goods is handed over to the Buyer is considered to be the day of the Warranty Claim settlement. When the Seller is not able to settle the Warranty Claim within the agreed period due to the specific nature of the Goods defect, he and the Buyer shall make an agreement 24
25 about an alternative solution. In case such agreement is not made, the Seller is obliged to provide the Buyer with a financial compensation in the form of a refund. SEVEN SPORT, s.r.o. Borivojova 35/ Praha 3, Czech Rebublic CRN: , VAT ID: CZ Orders: , objednavky@insportline.cz Warranty Claims: , Mobile: , reklamace@insportline.cz Service: , Mobile: , servis@insportline.cz Fax: , (Service ) Web: INSPORTLINE, s.r.o. Bratislavska 36, Trencin, Slovakia CRN: , VAT ID: SK Orders: +421(0) , +421(0) , objednavky@insportline.sk Warranty Claims: +421(0) , +421(0) , reklamacie@insportline.sk Fax: +421(0) Web: Date of Sale: Stamp and Signature of Seller: 25
РЪКОВОДСТВО БГ IN 9099 Мини Степер insportline Cylina CONTENTS Инструкция за безопасност...error! Bookmark not defined. Части...Error! Bookmark not de
 РЪКОВОДСТВО БГ IN 9099 Мини Степер insportline Cylina CONTENTS Инструкция за безопасност...error! Bookmark not defined. Части...Error! Bookmark not defined. Диаграма с частите...error! Bookmark not defined.
Упътване за употреба IN 8252 Бягаща пътека insportline T400i 1
 Упътване за употреба IN 8252 Бягаща пътека insportline T400i 1 Преди инсталация и употреба, моля прочетете упътването Упътвания за безопасност Обърнете внимание на следните инструкции. Съобразете натоварването
Microsoft Word - IN 5061 Krokoměr PR039
 Упътване за употреба IN 5061 Крачкомер insportline PR039 Въведение Благодарим ви, че избрахте този крачкомер. Това е кракомер, който показва време, брой стъпки, калории и др. полезна информация. За да
S 1006 Кростренажор SPARTAN Basic
 S 1006 Кростренажор SPARTAN Basic Инстрикции за безопастност! Основни предпазни мерки които трябва да се спазват, включително следните инструкции за безопасност при използване на това оборудване: Прочетете
ПЪТЕКА ЗА БЯГАНЕ SCUD TOKYO РЪКОВОДСТВО ЗА УПОТРЕБА
 ПЪТЕКА ЗА БЯГАНЕ SCUD TOKYO РЪКОВОДСТВО ЗА УПОТРЕБА Прочетете внимателно това ръководство за употреба преди да използвате продукта и го пазете внимателно Благодаря ви много за закупуването на този продукт,
УПЪТВАНЕ Facebook Телефон: Whatsapp: PowerLocus Истинските Безжични Bluetooth С
 УПЪТВАНЕ Facebook : @PowerLocus Email : powerdirect155@gmail.com Телефон:0885909483 Whatsapp: +31 633242189 PowerLocus Истинските Безжични Bluetooth Слушалки Как да включите PowerLocus? Моля, натиснете
GPI Document
 Позиция Кол. Описание 1 DUOLIFT.27.AP3B..8.3 Продуктов номер: 9917762 Забележка! Показаната снимка може да се различава от реалната. Wastewater collecting tank with a total volume of 27 liter. Incl. pipeset
GPI Document
 Дата: Кол. UPA 5-90.9.209 г. Забележка! Показаната снимка може да се различава от реалната. Продуктов номер: 99538895 Grundfos UPA 5-90 is a domestic booster designed for pressure boosting of drinking
GPI Document
 Позиция Кол. Описание 1 UNOLIFT.27.AP3B..6.A Продуктов номер: 99144937 Забележка! Показаната снимка може да се различава от реалната. Wastewater collecting tank with a total volume of 27 liter. Incl. pipeset
ИНСТРУКЦИИ ЗА УПОТРЕБА SM239/SM240 Велоергометър Hiton A3 Canary
 ИНСТРУКЦИИ ЗА УПОТРЕБА SM239/SM240 Велоергометър Hiton A3 Canary СХЕМА ЧАСТИ: Винт Винт Извита шайба Гайка Гаечен ключ (13-15) Шестограм Щифт за настройване Списък на частите Nо. Наименование Брой Nо.
PowerPoint Presentation
 TOWEL RADIATORS AND HEATERS ЛИРИ ЗА БАНЯ И НАГРЕВАТЕЛИ АЛУМИНИЕВИ ЛИРИ СТОМАНЕНИ ЛИРИ ЕЛЕКТРИЧЕСКИ ЛИРИ НАГРЕВАТЕЛИ ЗА ЛИРИ ALUMINIUM TOWELS STEEL TOWELS ELECTRICAL TOWELS ELECTRICAL HEATERS FOR TOWELS
РЪКОВОДСТВО ЗА УПОТРЕБА ПЪТЕКА ЗА БЯГАНЕ BZ-45/45.M Забележка: Като следваме принципите на устойчивото развитие, можем да променяме оборудването, кога
 РЪКОВОДСТВО ЗА УПОТРЕБА ПЪТЕКА ЗА БЯГАНЕ BZ-45/45.M Забележка: Като следваме принципите на устойчивото развитие, можем да променяме оборудването, когато е необходимо, без предизвестие. Всичко зависи от
GPI Document
 Позиция Кол. Описание UPA5-20 AUTO Продуктов номер: 98699677 Забележка! Показаната снимка може да се различава от реалната. Applications Domestic applications requiring high pressure in taps, showers,
Правилник на кампанията Ловци на оферти В периода 5 8 март 2019г. Данте интернешънъл С.А. (Dante International S.A.) самостоятелно, както и някои от м
 самостоятелно, както и някои от м") Правилник на кампанията Ловци на оферти В периода 5 8 март 2019г. Данте интернешънъл С.А. (Dante International S.A.) самостоятелно, както и някои от маркетплейс търговците на emag.bg, всеки търговец поотделно,
Правилник на кампанията Ловци на оферти В периода 5 8 март 2019г. Данте интернешънъл С.А. (Dante International S.A.) самостоятелно, както и някои от маркетплейс търговците на emag.bg, всеки търговец поотделно,
Проверил: Р.Ч./ г
 ПРЕВОД НА ОРИГИНАЛНА ИНСТРУКЦИЯ ЗА УПОТРЕБА JS0309 ЗЕГЕ ПРЕДУПРЕЖДЕНИЕ За ваша безопасност, преди да използвате машината, внимателно прочетете тази инструкция за употреба. ИНСТРУКЦИИ ЗА БЕЗОПАСНОСТ Когато
KU12-3
 Инвест Електроникс ЕООД КРАЙНО ИЗПЪЛНИТЕЛНО УСТРОЙСТВО Упътване за монтаж и експлоатация (версия 1.1 / януари 2008) Инвест Електроникс си запазва правото на промяна на този документ без предизвестие СЪДЪРЖАНИЕ
GPI Document
 Позиция Кол. Описание 1 UPA 15-90 160 Продуктов номер: 59539521 Забележка! Показаната снимка може да се различава от реалната. Applications Domestic applications requiring high pressure in taps, showers,
Microsoft Word - 1Инструкция БИОФОН-превод.BG1.doc
 Управляем генератор на амплитудно модулирани сигнали «БИОФОН» ПАСПОРТ (Инструкции за употреба) Прочетете преди употреба Съдържание: Съдържание на пакета...3 Характеристики на устройството...4 Дизайн и
man_de_en_es_fi_fr_nl_pt_sv.indd
 Energiekosten-ftftessgerat,,Premiumcc Електромер за разход на енергия 00047770 l47770man_de_en_es_fi_lr_nl_pt_sv.indd 3 21.01.13 15:3 2 147770man_de_en_aa_ Jr_nL.pLav.lndd 2 21.01.13 15:3 o-c.o-ci > I
Ръководство за употреба на вибрираща машина insportline ResoBelt IN 2185 СЪДЪРЖАНИЕ I. Указания за безопасност II. Инструкции за инсталиране III.Експл
 Ръководство за употреба на вибрираща машина insportline ResoBelt IN 2185 СЪДЪРЖАНИЕ I. Указания за безопасност II. Инструкции за инсталиране III.Експлоатация на уреда IV.Друго Уважаеми клиенти, Моля, прочетете
SMT-D КЛЮЧ ЗА УПРАВЛЕНИЕ Инструкция за монтаж и работа
 Инструкция за монтаж и работа Съдържание ПРЕДПАЗНИ МЕРКИ ЗА БЕЗОПАСНА РАБОТА 3 ОПИСАНИЕ НА ПРОДУКТА 4 АРТИКУЛНИ КОДОВЕ 4 ОБЛАСТ НА ПРИЛОЖЕНИЕ 4 ТЕХНИЧЕСКИ ДАННИ 4 СТАНДАРТИ 4 ЕЛЕКТРИЧЕСКО СВЪРЗВАНЕ 5 МОНТАЖНИ
HOT AIR GUN SOLLEO 0503KPHG1601 ORIGINAL INSTRUCTIONS Проверил: Р.Ч./ г.
 HOT AIR GUN SOLLEO 0503KPHG1601 ORIGINAL INSTRUCTIONS Electrical devices are disposed of in the household rubbish. Front of the machine, accessories and packaging for ecological recycling. According to
unknown
 МИКРОВЪЛНОВА ФУРНА ЗА ВГРАЖДАНЕ HLAWD53N0 ЧЕРЕН Винаги в експлоатация: нашата микровълнова фурна за 38 см стенен шкаф. Автоматични програми - Вашият кухненски помощник с правилните настройки по подразбиране.
ХЛАДИЛНИК ФРИЗЕР С DC КОМПРЕСОР МОДЕЛ: DC-26F / 32F / 42F ИНСТРУКЦИИ ЗА УПОТРЕБА ( Български) Поздравления за покупката на този качествен Хладилник Фр
 Поздравления за покупката на този качествен Хладилник Фр") ХЛАДИЛНИК ФРИЗЕР С DC КОМПРЕСОР МОДЕЛ: DC-26F / 32F / 42F ИНСТРУКЦИИ ЗА УПОТРЕБА ( Български) Поздравления за покупката на този качествен Хладилник Фризер. Ние, производителите, вярваме че ще се радвате
ХЛАДИЛНИК ФРИЗЕР С DC КОМПРЕСОР МОДЕЛ: DC-26F / 32F / 42F ИНСТРУКЦИИ ЗА УПОТРЕБА ( Български) Поздравления за покупката на този качествен Хладилник Фризер. Ние, производителите, вярваме че ще се радвате